Install Python locally from scratch
There are several ways to install python, but in this documentation we will use the Anaconda Distribution platform because it contains various convenient tools to install and configure python quickly.
1 - Install Anaconda
Start by downloading the installer relative to your operating system on the Anaconda official website.
Once it is done, install it.
When installation is done, launch Anaconda-Navigator

You will see a graphical interface looking like this:
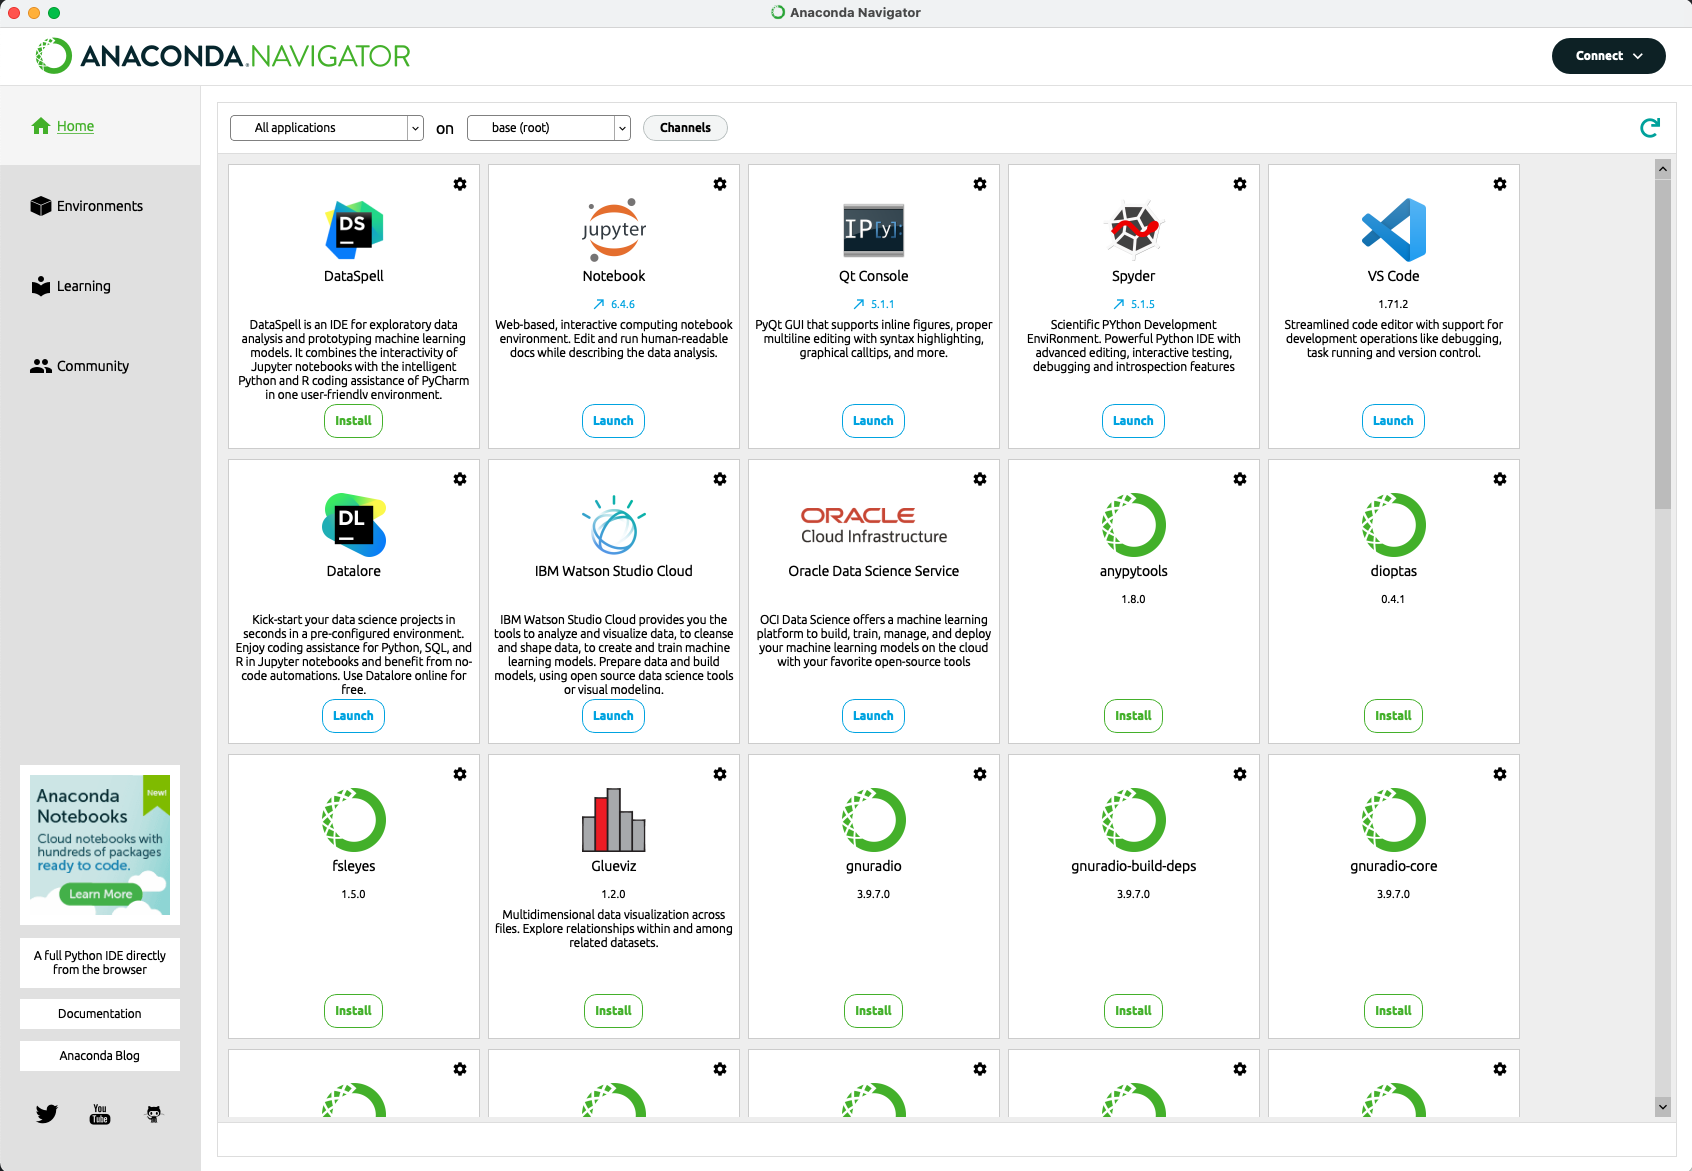
From this interface, you will be able to manage many aspects like the python packages that you’ve installed for example.
2 - Choice of an IDE
At this stage, in order to use python you can simply launch an interpreter from your terminal (by using the command python) or use an IDE (Integrated Development Environment) which will generally come with a number of tools and functionnalities designed to help coding.
Among the popular ones, we can list Spyder, PyCharm, Jupyter, VS Code…
They all have pros and cons relative to each other making them suitable for various tasks.
In this tutorial, we will use Spyder because it already comes with the Anaconda Distribution and has a nice and intuitive interface.

3 - Create Conda environnement
When you install Anaconda, a python environnement is set on your computer called base. This base environment contains a version of python and some other basic packages. At this step you can simply launch Spyder from the Anaconda-Navigator graphical interface and start coding.
But over time, you will probably need to install python packages that will allow you to perform other tasks. When it comes to that, it is generally of good practice to create a new environment so the base environment is not altered (See section below to install python packages). Creating a new environnement can be useful to avoid compatibility issues between packages or to use python tools with specific packages requirements for example.
In order to create this new environnement you can proceed by using the graphical interface or the terminal.
-
With the graphical interface:
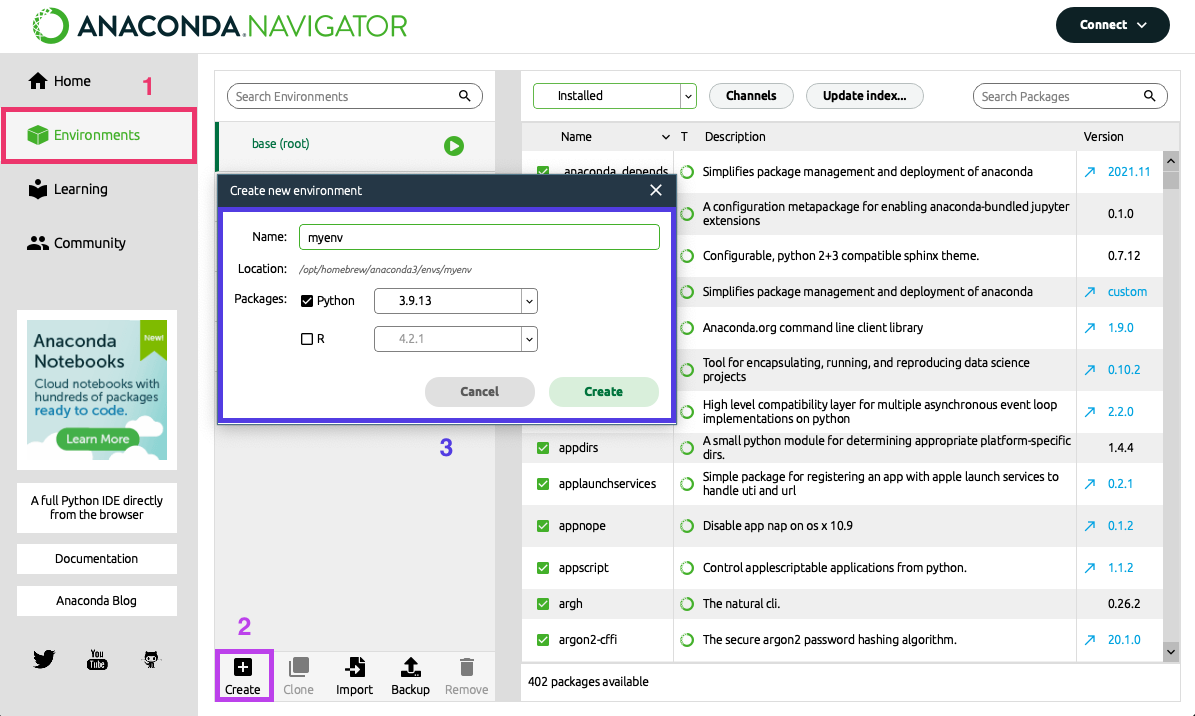
- Select the Environments tab
- Clic on the “Create” icon
- Enter the name of the new environment, select the version of python you want and clic on “Create”.
-
With the terminal:
Create the new environment with a specific version of Python, using the command:
conda create -n env_name python=X.XWhere:
env_nameis the name of the environment you want to createX.Xis the python version
For this tutorial we will use the myenv environnement name and the latest python version available as for now 3.10.
conda create -n myenv python=3.10
After this step, the conda environment should have generated a python executable of the version you chose in a path looking like:
/home/username/anaconda3/envs/myenv/bin/python
4 - Install spyder-kernels package
In order to Spyder to be able to use the python interpreter generated by your conda environment myenv, you will need to install the spyder-kernels package in this environment.
This package provides Jupyter kernels for use with the consoles of Spyder.
- Open a terminal
- Activate the conda environment myenv by using the command:
conda activate myenv - Install the package via the command:
conda install spyder-kernels=2.3
spyder-kernels should be >= 2.3.0 and < 2.4.0. Consider this might change later. It will get notified in the Spyder console. From then you will have to remove the spyder-kernels package currently installed on the myenv environment and install the new required version (Check Useful commands to see how to remove packages).
5 - Configure Spyder
At this point, you will need to set the conda environment myenv as the default environment used by Spyder. For this step, launch Spyder and clic at the bottom right of the window as showed in the figure below:
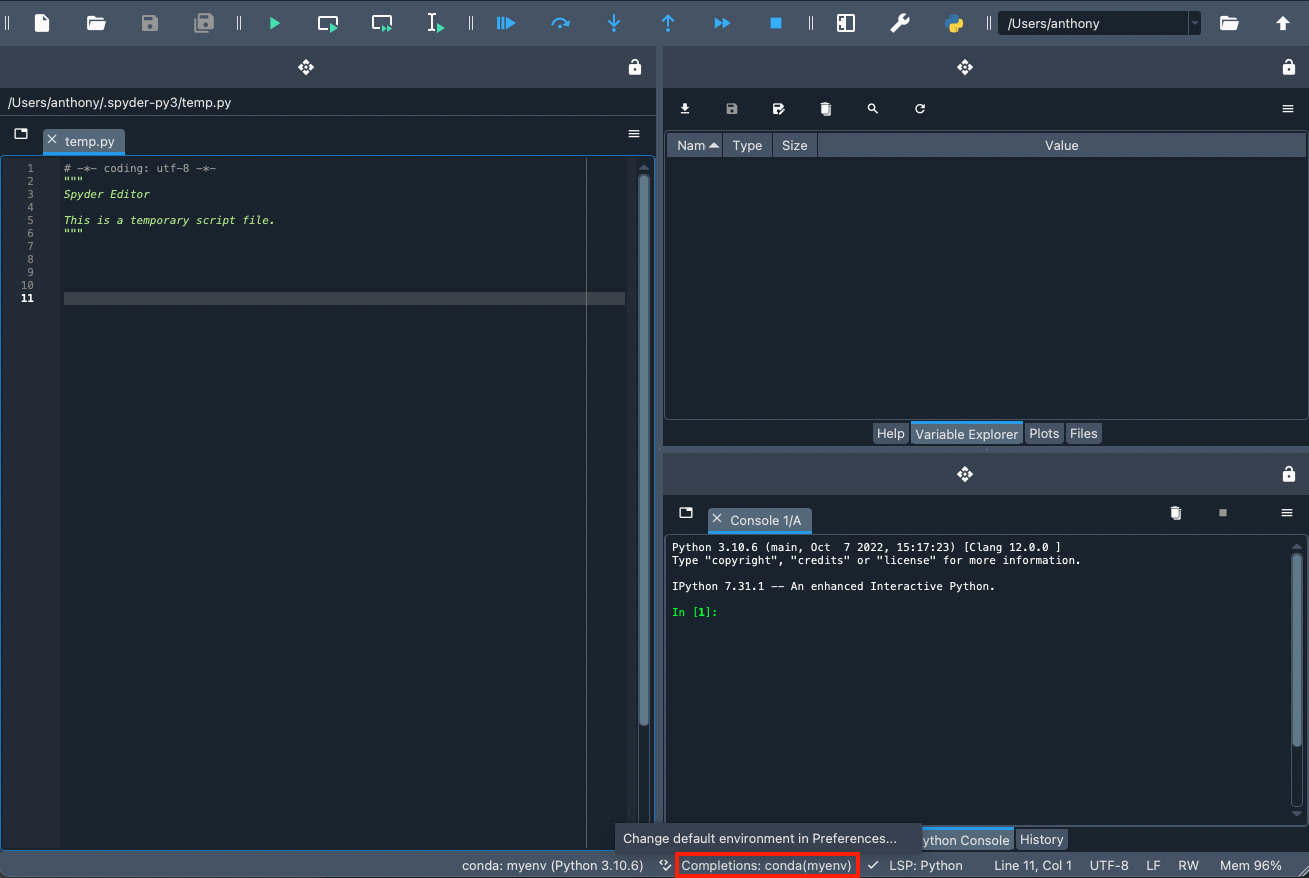
Then clic on Change default environment in Preferences.
A window should open:
- Select the Python interpreter tab
- Tick the Use the following Python interpreter box.
- Clic on the dropdown menu
- Select your python interpreter (If the environment has been successfully installed, it should appear)
- Apply the changes
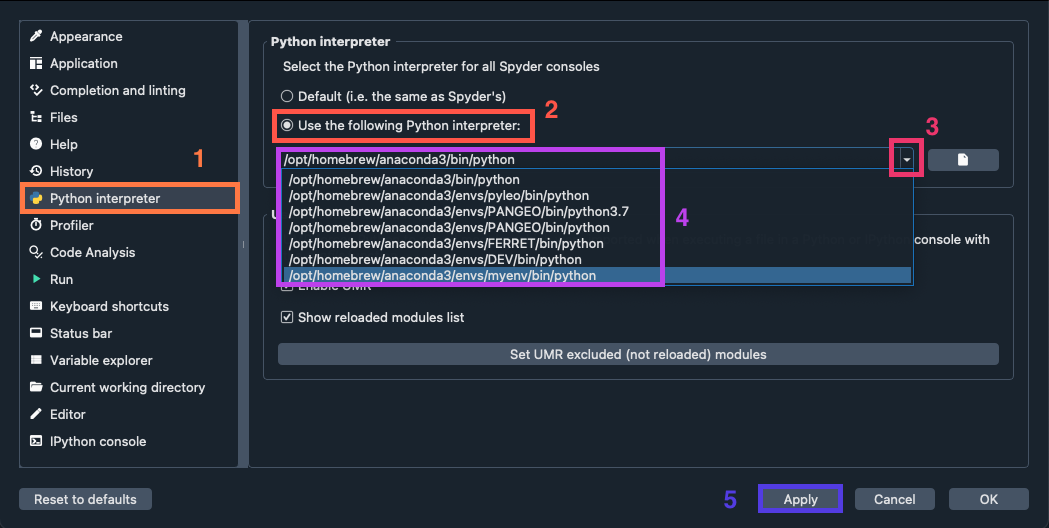
On the figure above (box n°4) you can see that beside the base environment several other environments have been installed like pyleo, PANGEO, FERRET, DEV and myenv.
At this point you’ve selected the python interpreter from the myenv environment to be used as default python interpreter in Spyder’s iPython console.
Now you need to have a console using this new python interpreter. For this step, either restart spyder or right clic in the console tab and select New console (default settings)
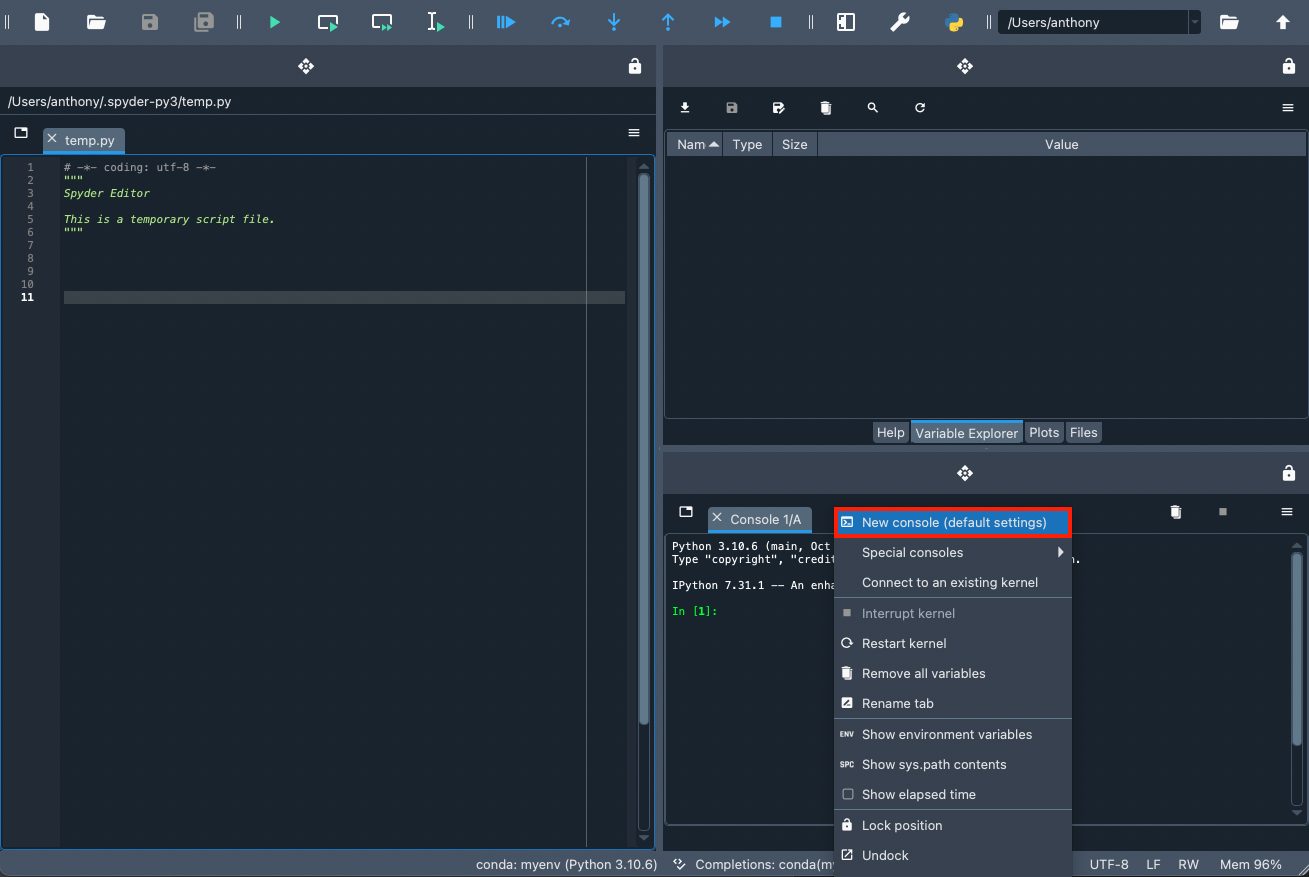
A new console will appear and should be operational to start using python.
6 - Install python packages
Now you have successfully installed Anaconda, created a new environment and configured Spyder, you will need at some point to install new python packages in your myenv conda environment.
They can be installed either through the graphical interface or the terminal.
-
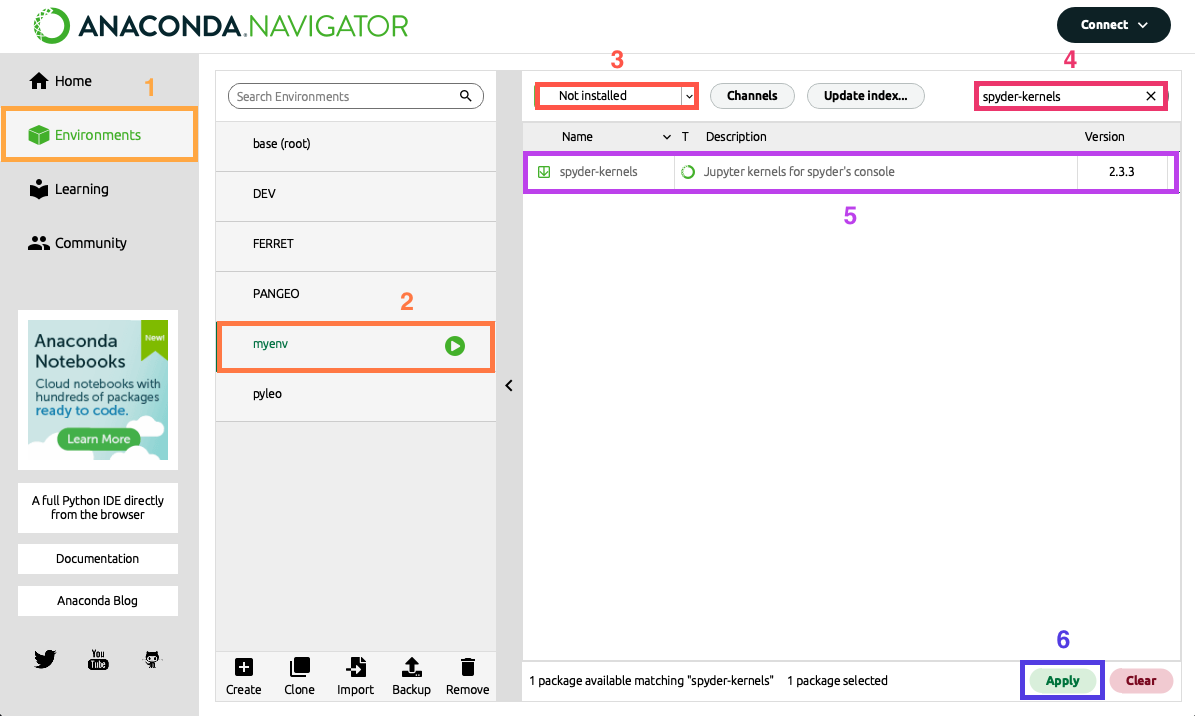
With the graphical interface, the step is pretty straightforward:
- Select the Environments tab
- Select the environment you want to install the package in
- Select “Not installed” in the dropdown menu
- Write the name of the package you want to install in the search bar
- Tick the box of the package
- Select “Apply”
-
With the terminal:
- When you know the name of the package you want to install search for the right conda install command on the official Anaconda website. For example we can look for the
numpypackage on the website. All the commands available are listed. - Open a terminal
- Activate the conda environment myenv by using the command:
conda activate myenv - Use one of the commands listed on the anaconda website. In our example:
conda install -c anaconda numpy
Note: we could have also used thepipcommand to install python packages but remember it is generally not advised to mixpip installandconda installin a conda environment. You can find more informations to understand pip and conda here. - When you know the name of the package you want to install search for the right conda install command on the official Anaconda website. For example we can look for the
Useful commands
Here is a list of useful commands you can use in a terminal to manage your conda environments and packages:
- List all your conda environment:
conda env listconda info --envs - Create environment myenv with a specific python version X.X:
conda create -n myenv python=X.X - Remove environment myenv:
conda env remove --name myenv - Activate environment myenv:
conda activate myenv - Deactivate a conda environment and return in base environment:
conda deactivate - List installed packages in current environment:
conda list - See if a specific package py_pack is installed in current environment:
conda list py_pack - See if a specific package py_pack is installed in environment myenv:
conda list -n myenv py_pack - Install package py_pack in current environment: Look for the command on the official Anaconda website
- Remove package py_pack in current environment:
conda remove py_pack
